Display control
Refresh speed, partial updates and measured color and grayscale photo LUTs for the 13.3-inch OpenPaper L.
Choose the update for the job
- Change the whole picture. The faster clock cut panel drive from 35.8 to 14.9 s. See how much blue and green change before using it for photos.
- Keep a color background on screen. The departure board advances its seconds and route bar locally. For fields that must erase cleanly, compare both partial-refresh settings.
- Add marks without a visible full-screen flash. On prepared white, 14 separate letters took 6.10 s. A one-second clock marker showed where ghosting accumulates.
- Compare photo rendering on the panel. Drag across the default and tuned portrait to inspect skin tones, facial contrast and dither texture. The three-photo trial explains why we chose the single-pass 16-code profile.
These recordings show a single 1600 × 1200 OpenPaper L on experimental bench firmware. The normal dynamic clock is the full-frame reference. The timings below distinguish panel BUSY, drawing a whole sequence and the interval between ticks. Refresh measurements and recordings.
Berlin Hbf departure board
Draw the timetable in one full-color refresh. Put frequently changing fields in their own windows and leave the destinations, platforms and colored headings in the base image. Once a second, one partial refresh updates two small windows together. One advances the clock digits at the top right. The other extends the blue route bar. The bar reaches Hamburg in 20 seconds.
Separate partial refreshes change the ICE’s Expected time from 18:46 to 18:49 and then 18:51, and make the paperlesspaper.de wordmark blink three times.
The perspective-corrected wide view includes the Spyder Checkr 24 beside the panel throughout the run. Watch the close-up to inspect the digits and route bar.
Letter-by-letter animation
Watch the top line spell PAPER. As the lower line spells LESSPAPER, the rectangle grows alongside it. Each partial update adds one blue letter and preserves the ink already on the panel. This real-time take uses 60 ms pulses. The median interval between letter starts was 0.44 s.
Budget for two stages. Preparing white took 38.5 s in the filmed 60 ms run. Then the firmware powered up each window, drove the new strokes and cut the pulse with a hardware reset. Preloading the letters and drawing each outline segment with its letter brought the sequence to 6.38 s. Shortening the pulse to 40 ms brought it to 6.10 s. No full-screen flash was visible during drawing. Watch both runs side by side in real time. Timing comparison and recordings.
Partial updates and the area outside the window
For a field that must erase as well as draw, write the replacement pixels into a window and let the waveform finish. At the fast clock, a 240 × 400 window covering 5% of the panel still took about 15 seconds, about as long as the whole screen. Sending 0x01 with the refresh command (0x12) kept the surrounding dark, red and blue patches close to their original appearance during repeated black/white updates. The active window still flashed.
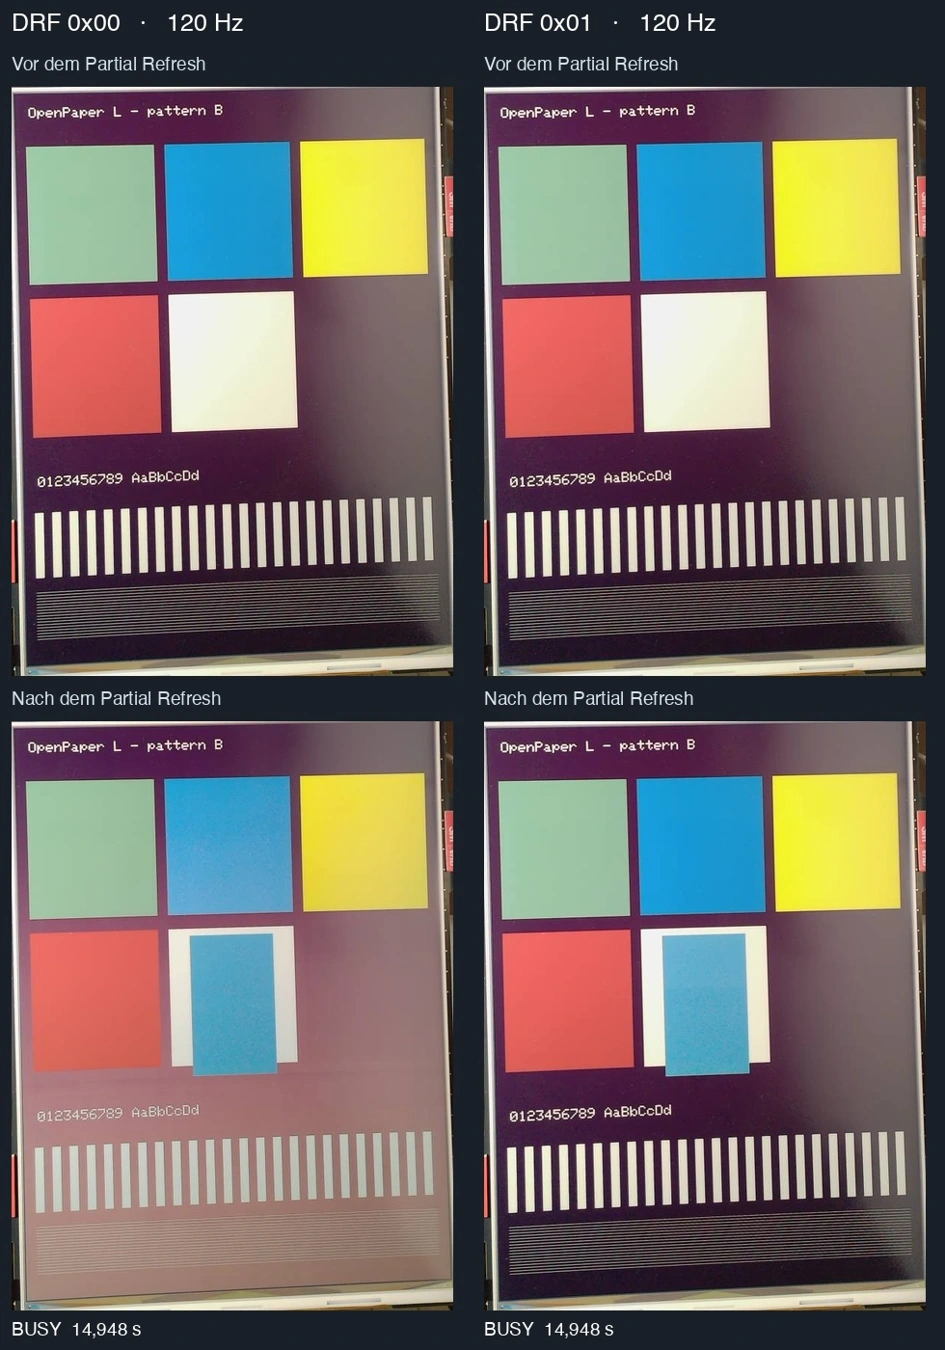
Changing the factory-profile selector did not produce a fast red-only update that finished without reset. Red-window recordings and profile trials.
Early cutoff, digits and a one-second hand
For changing digits, the firmware interrupted black after 10 s with a hardware reset and let white finish to BUSY-ready. Cutting white at 13.5 s left the first erase visibly darker. Digit video and ghosting measurements.
To show seconds without flashing the whole face, change the smallest shape you can. A short marker at the edge of the clock advanced once per second for 60 ticks on a 100 ms drive pulse per tick. The dial avoided a full-screen flash. A yellow ring remained after one revolution. For a clock face, put the marker on the rim and plan a full redraw to clear accumulated marks. Blue-marker video.
Full-frame speed, flashing and color
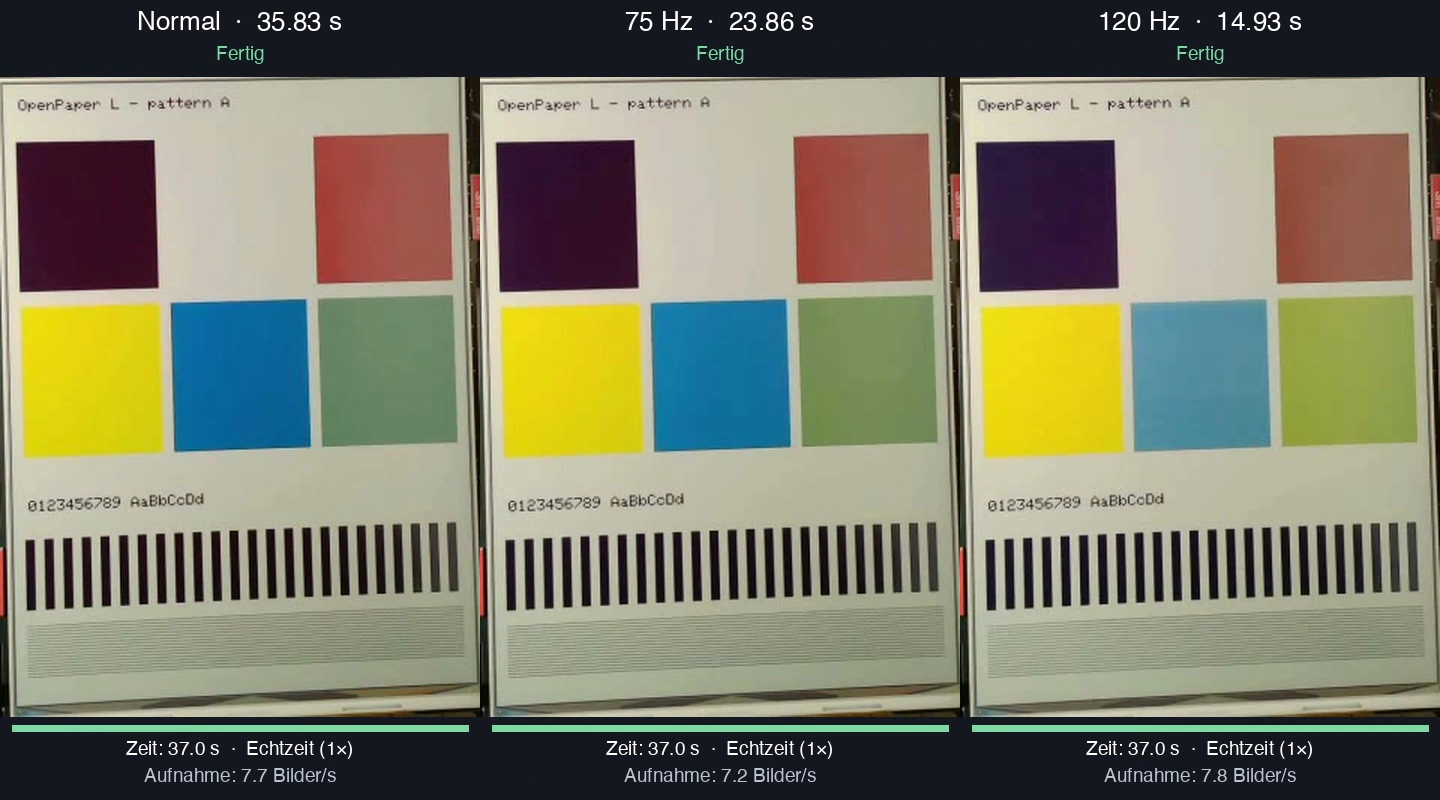
For a photo frame, compare the settled blue and green before choosing a clock. For a frequently replaced dashboard, the fastest tested clock saved about 21 seconds per full draw. All three settings flash. Register 0x30 selects the clock. BUSY time measures the panel drive after image transfer.
| Clock setting | Register value | BUSY in this comparison | Settled color |
|---|---|---|---|
| Normal (dynamic) | 0x08 | 35.8 s | Reference |
| Nominal 75 Hz | 0x04 | 23.9 s | Green shifts toward yellow |
| Nominal 120 Hz | 0x07 | 14.9 s | Blue becomes paler and shows a vertical band |
Portrait with default and tuned rendering
Move the divider across Eileen Collins’s face. Look at the color of the cheeks, the shadow beneath the chin and the individual dots where the skin meets the dark collar. Each side is a camera photograph of the same physical spot on OpenPaper L. Both photos use the reference card in the shot to correct the camera colors. Select a label to open the full-size crop or view the digital source.
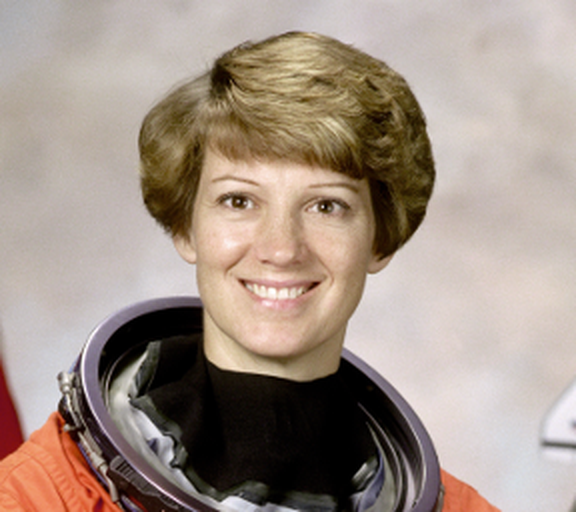
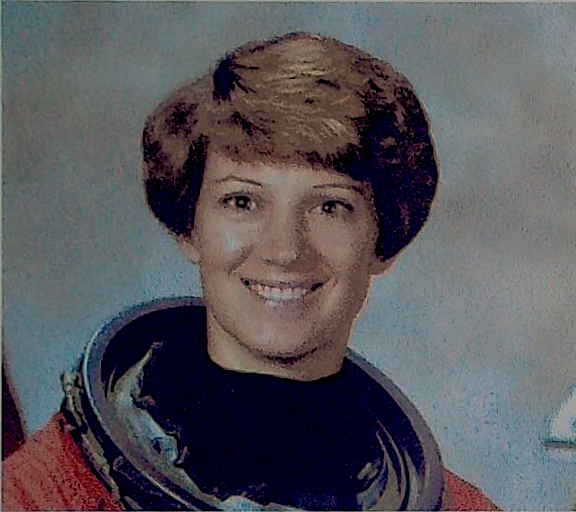
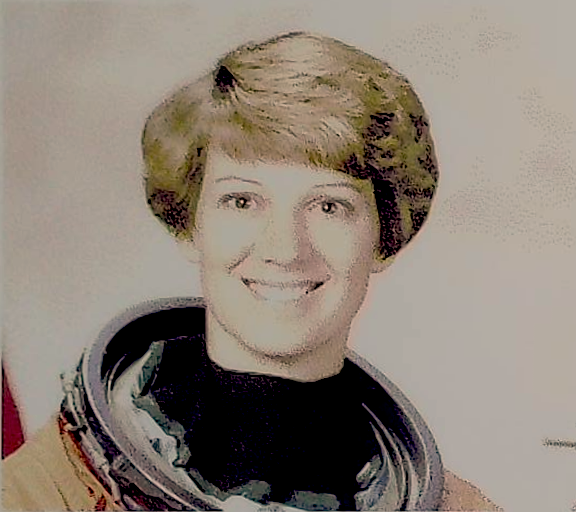
The tuned portrait keeps more shading in the face. On the cheeks and forehead, mean color error fell from 13.11 to 3.30 ΔE₀₀. Facial lightness contrast rose 32%. On the panel, the two uniform cheek-color patches had more dither grain with the tuned profile. The default used mostly paper-white pixels in both patches.
What changed in the renderer? The editor’s Auto / Natural setting chose serpentine Stucki dithering with its standard six-color palette for this crop. The tuned version used serpentine Floyd–Steinberg with the measured raw16 palette. Both ran on frame-2 with the normal full-color waveform. This compares the complete recipes, including the choice of dither algorithm. Portrait measurements and capture method.
Color photos with less grain
The raw16 photo profile lets Floyd–Steinberg dithering choose among all 16 four-bit image codes in one normal refresh. On frame-2 those codes produced seven distinguishable groups of solid colors, including a muted blue. Across 12 uniform patches, measured grain fell 22% compared with six-code dithering. Average color error across the three photographs stayed about the same.
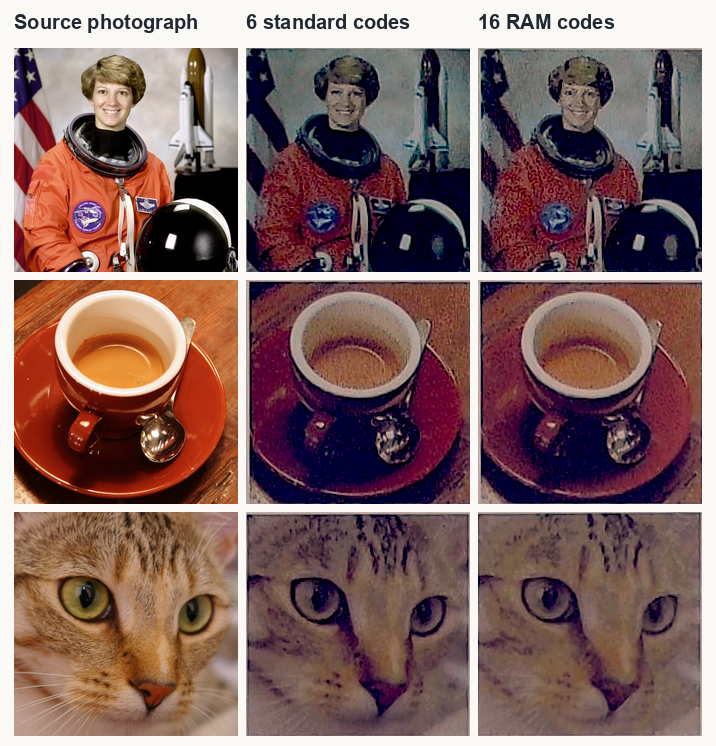
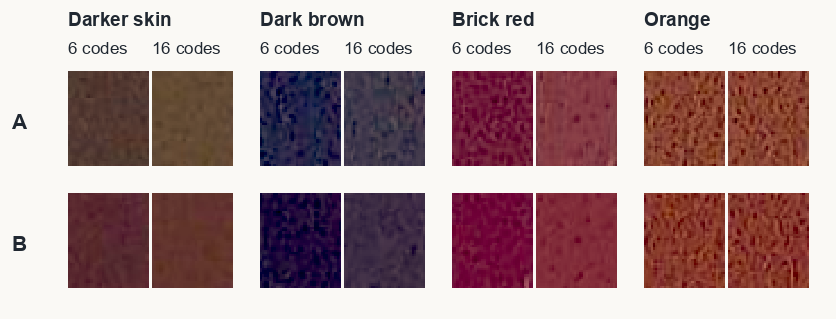
To encode your own photograph, unpack the color photo renderer (ZIP), install NumPy and Pillow, and run these commands in the extracted directory. The two output folders contain the image RAM for each controller half on the bench. The editable color LUT (JSON) pairs measured colors with pixel codes. The controller supplies the voltage waveform. Paired measurements and two-pass photo trials.
cc -O3 -fPIC -shared diffuse.c -o diffuse.so -lm
python3 render_photo.py photo.jpg six-code-output --mode normal
python3 render_photo.py photo.jpg sixteen-code-output --mode raw16
Native colors, orange and skin tones
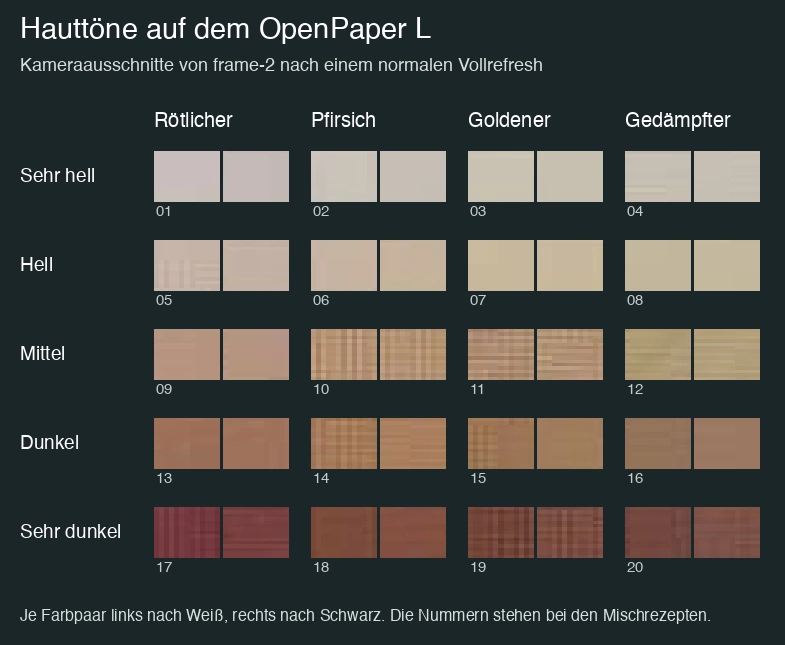
The six standard image codes produce black, white, red, yellow, blue and green. Mixing adjacent red and yellow pixels gave repeatable saturated orange. For pale pink, a 4 × 4 tile used 14 white pixels and two red ones. A separate two-pass test produced a solid peach suitable for light skin. It prepared the pixel with red (0x3) and drove blue (0x5) for 2.8 s. Solid-color measurements.
Grayscale photographs, text and dithering
In the Apollo photograph, eight mixed levels preserved the folds in the bright sleeve. Sixteen reduced coarse grain but added fine texture. Six directly driven tones without dithering lost detail in the highlights.
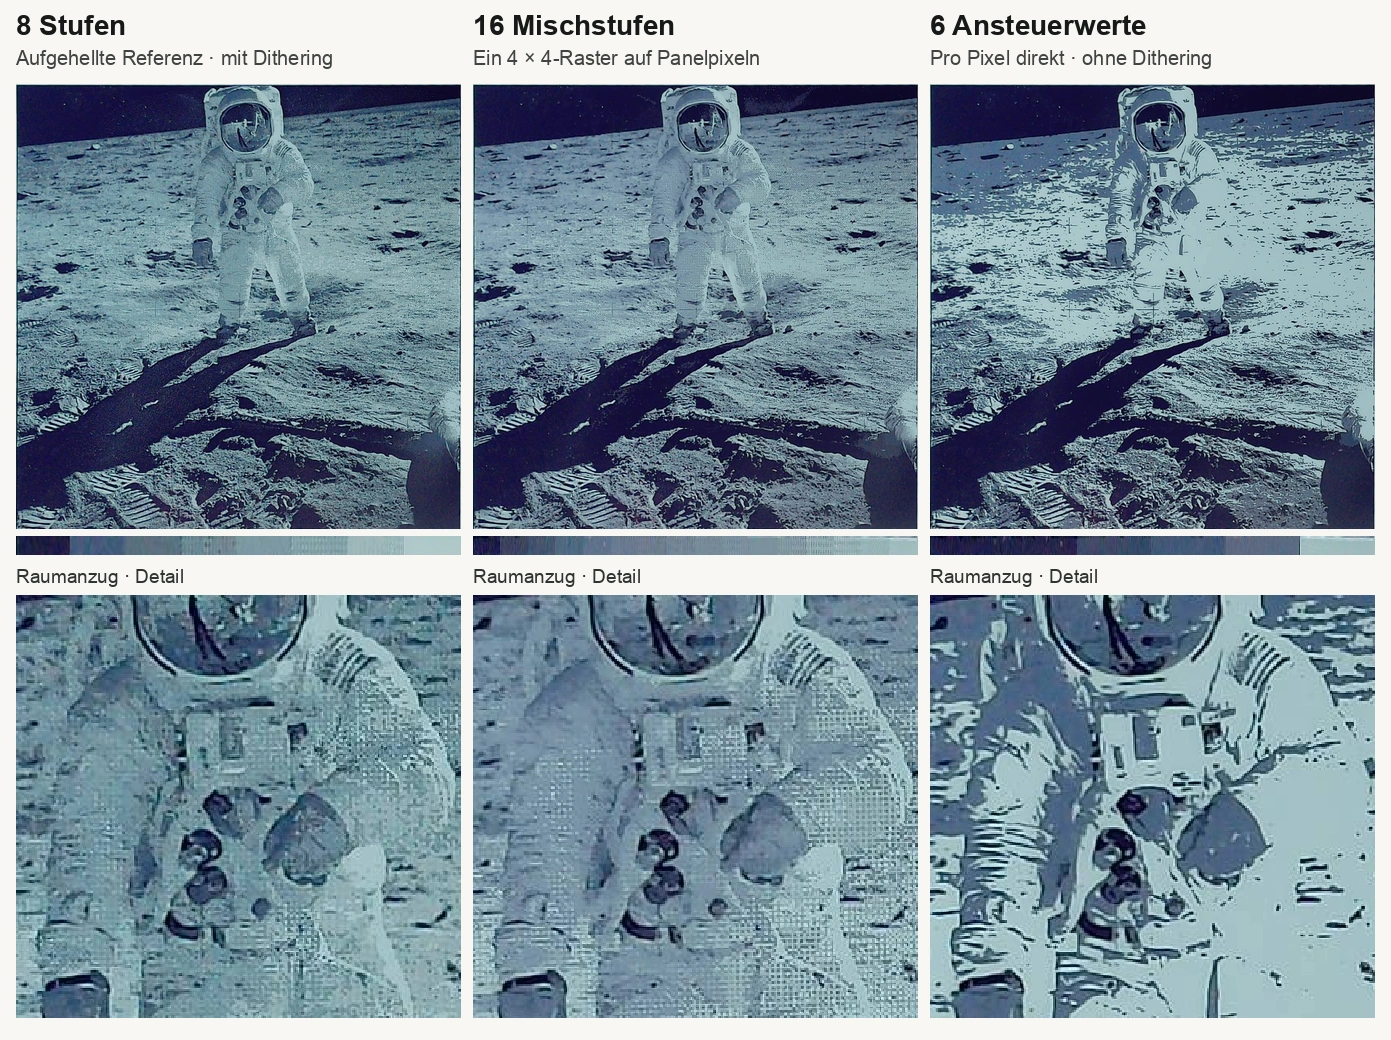
For uniform fills, the two-pass FD recipe gave a light, cool gray at 2.8 s. Small pulse or position changes affected some of the paler recipes. Solid gray samples and pulse measurements.
Grayscale text antialiasing
Look at the diagonal strokes of the A in “Auf dem Mond.” A black-and-white renderer has to round each partly covered pixel to ink or paper. On the OpenPaper L test unit, one intermediate gray softened those steps while the solid strokes stayed black.
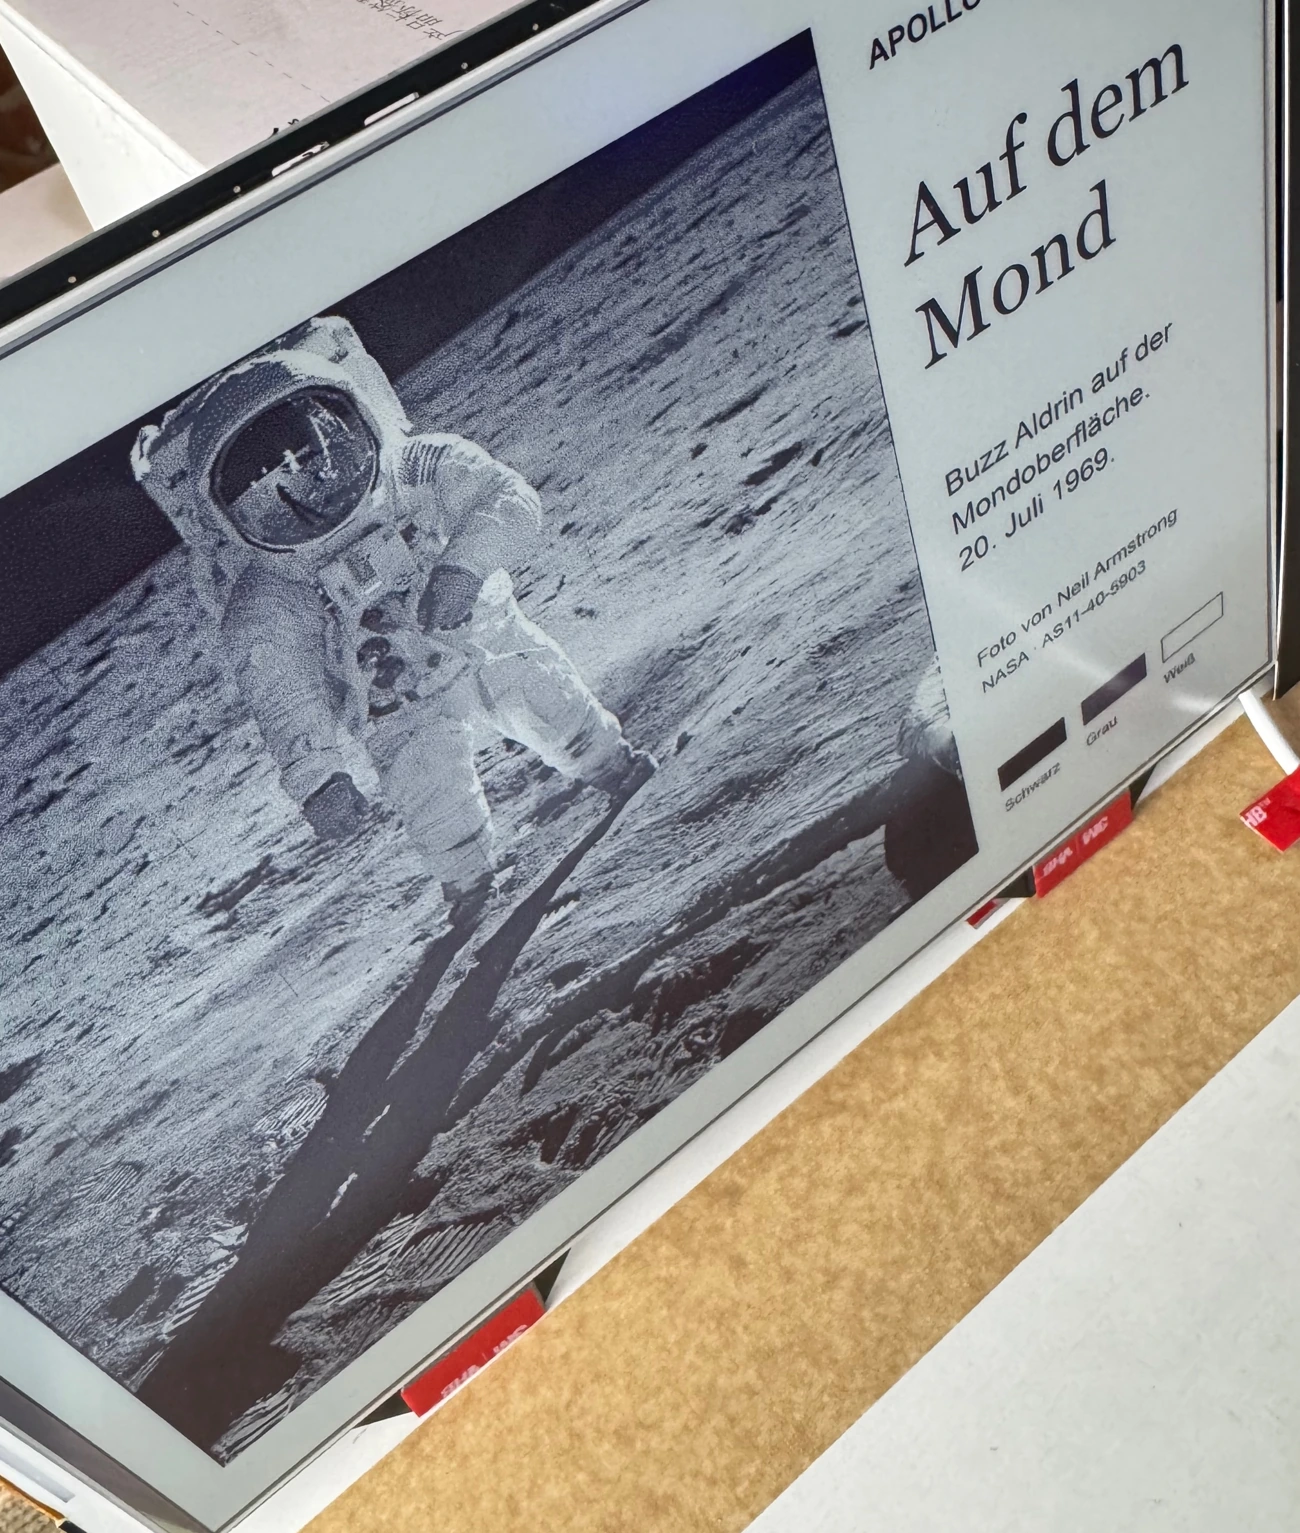
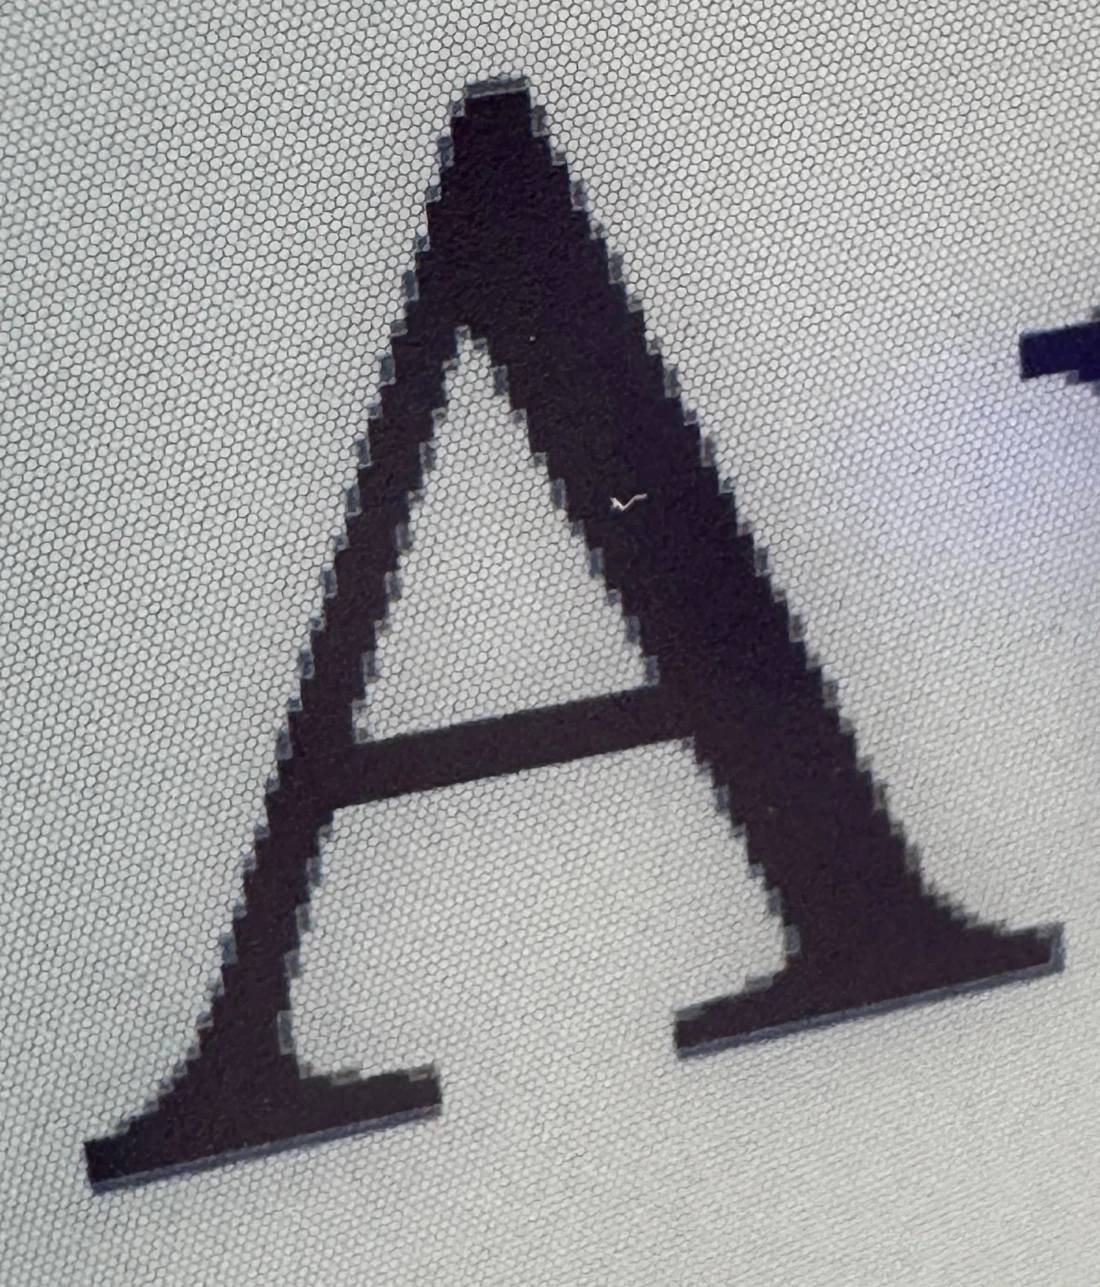
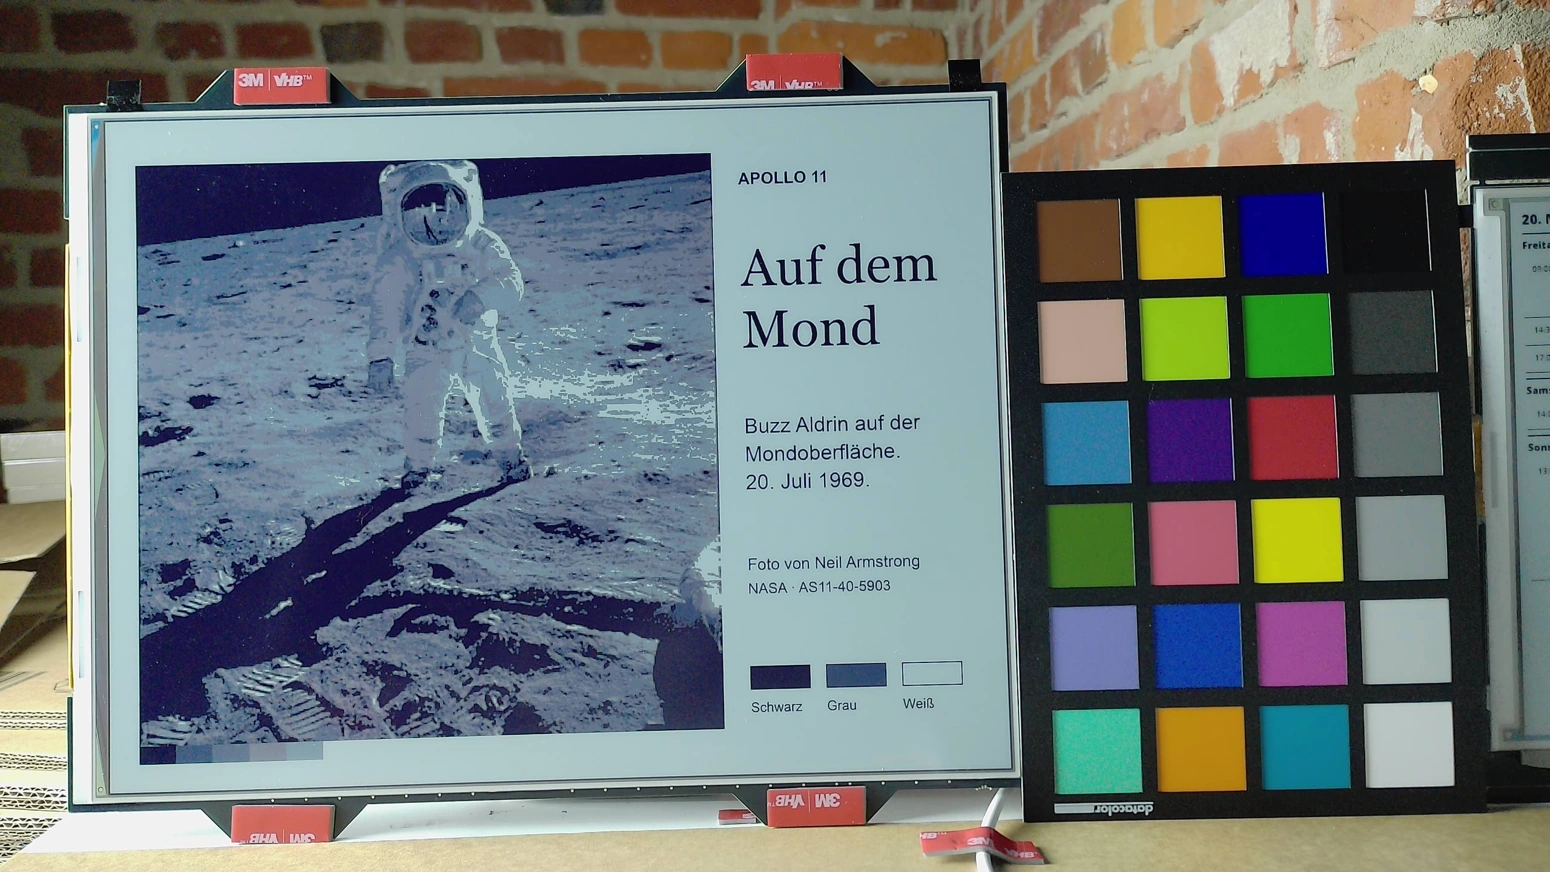
To reproduce the lettering, render a grayscale glyph mask at 3× the target size, then downsample it to panel resolution with Lanczos. Map each pixel to the nearest of black, the measured gray or white. The Apollo renderer used 0, 81 and 255 on its relative brightness scale. It quantized the text separately so diffusion errors from the photograph could never add speckles to the letters. The intermediate gray required the experimental panel drive. Three-level test and white-background measurements.
Setting a custom LUT
You can edit the grayscale photo LUT in the bench firmware. It maps image brightness to two-pass pixel recipes. For example, FD prepares a pixel with code F and drives it with D during the timed update. Loading custom voltage waveforms into the NT61522 remains unverified. Controller references.
- Save the example photo LUT (CSV) and Python encoder/decoder in the same directory.
- Edit the two-hex-digit
recipeand its inclusive brightness limit,upper_luma(0–255). Use 16 rows with nondecreasing thresholds ending at 255. Repeat 255 to fill unused rows. - Generate the command in that directory.
python3 patch_palette.py photo photo-lut.csvSend the printed FINEPHOTO line followed by a newline to the bench serial console at 115200 baud. It renders the built-in Apollo photo with your table and a 2.8 s partial pulse. Photo rendered with the example LUT.
Path demos
Each recording starts on a prepared white screen and runs at real speed. A partial update adds a short piece of a curve, a printed character or a Morse symbol. Previously drawn details stay on the page while the next mark can appear anywhere on the panel. Step counts and drawing times.
Midnight Edition
HOLD THE FRONT PAGE goes to press first. The headline “The city after dark” appears one letter at a time. Follow the crescent, towers and suspension cables as the bridge is drawn. The East River dateline completes the edition.
Last Train Home
Start at East End, on the right. The track turns north to East Market, bends south through Canal and doubles back toward Home. Each station circle closes before its name appears. On the straight stretch by Museum, the joins between blue strokes are slightly darker.
Signal from the Moon
Read the signal outward from the antenna. A dash spells T, four dots spell H, and one dot spells E. Each decoded letter appears below its completed Morse group until the page reads THE EAGLE HAS LANDED.